How to Crop in Preview on Mac: Full 2026 Guide

To crop in Preview on Mac, open your image or PDF, click Show Markup Toolbar, select the Rectangular Selection tool, drag over the area you want to keep, then click Crop (or press Command-K). It works the same way for both photos and PDFs, and Preview lets you undo the crop anytime before you save.
I’ll be honest with you — for years, I didn’t even realize my Mac had a built-in tool that could handle basic photo editing and PDF editing without me needing to download anything extra. Then I discovered Preview, and it changed how I handle quick image and document edits forever.
If you’ve ever needed to crop an image on Mac or trim down a PDF before sending it off, you’re in the right place. This guide is updated for macOS 2026, and I’m going to walk you through exactly how I crop in Preview, step by step, with zero fluff. Let’s get into it.
What Is Preview, Anyway?
Before we jump into the how-to, let me quickly explain what we’re working with here. You might already have this app open right now without realizing its full power.
Preview is Apple’s native Mac Preview app — it comes pre-installed on every Mac, and while most people think of it as just a photo viewer, it’s actually a surprisingly capable editing tool. You can resize photos, rotate them, and — the star of this show — crop images and PDFs with just a few clicks.
And here’s the best part: you don’t need Photoshop, you don’t need a subscription, and you don’t need to learn some complicated new interface. It’s already sitting on your dock. If you’re curious about lightweight alternatives too, I’ve also put together a guide on free AI photo editor tools and apps worth checking out.
How to Crop an Image in Preview (Step-by-Step)
Okay, let’s get to the good stuff. This is the part you actually came here for, so I’m not going to waste your time.
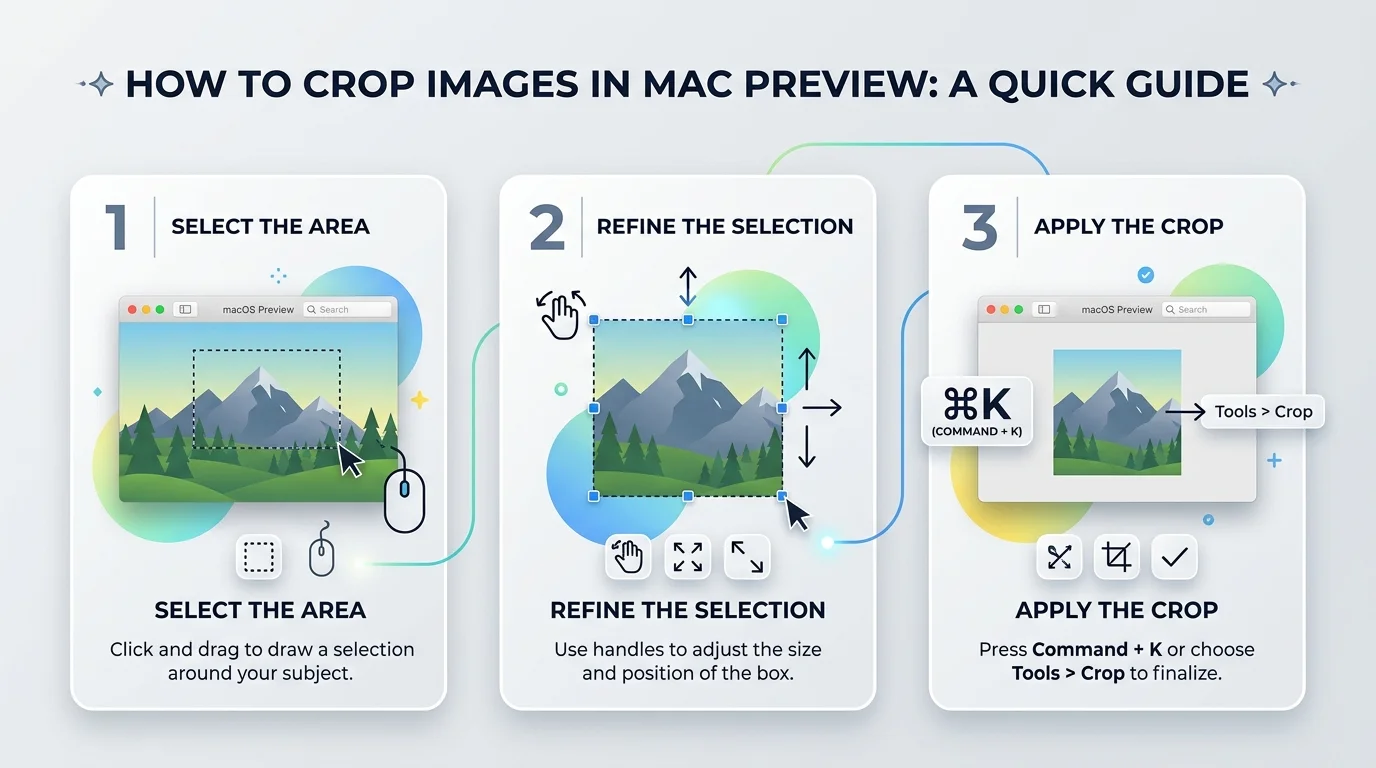
Here’s exactly what I do every single time I need to crop a photo:
- Open your image in the Preview app.
- Click Show Markup Toolbar (if it’s not already visible).
- Select the Rectangular Selection tool — this is your crop tool.
- Click and drag to draw a box around the part of the image you want to keep.
- Once you’re happy with your selection, hit the Crop button in the toolbar.
That’s it. Genuinely, that’s the whole process. You first select the area you want to keep, and then Preview discards the rest — and if you want to view the exact dimensions of your selection, you can choose Tools > Show Inspector and pick a unit of measurement in the Crop Inspector window.
Made a Mistake? Here’s How to Undo It
Don’t panic if you crop the wrong section — I’ve done this more times than I’d like to admit. To undo the crop immediately, just choose Edit > Undo Crop. And if you realize later that you need the original back, you can go to File > Revert To > Browse All Versions and restore the version from before you cropped it.
This is honestly one of my favorite things about Preview — it’s forgiving. You’re not going to permanently destroy your original file by accident.
Cropping to a Specific Size or Aspect Ratio
Here’s a question I get a lot: can you crop to an exact pixel size in Preview? Yes, sort of.
After making your rectangular selection, open Tools > Show Inspector, then click the Crop Inspector icon. From there, you can view and adjust the dimensions in inches, pixels, centimeters, or points before you commit to the crop. It’s not a true “type in exact dimensions and auto-crop” feature like some paid tools offer, but it does let you fine-tune your selection with real numbers, which is great for prepping images for social media dimensions or a specific aspect ratio.
How to Crop a PDF in Preview
Now, cropping images is great, but what about PDF cropping? Good news — the process works almost identically.
Here’s how I do it:
- Open your PDF file in Preview.
- Show the Markup Toolbar.
- Select the Rectangular Selection tool.
- Drag to select the portion of the page you want to keep.
- Click Crop (or press Command-K).
Just like with images, you’re selecting the area you want to keep and discarding the rest — and you can undo the crop immediately through Edit > Undo Crop, or later through File > Revert To > Browse All Versions.
Important: Preview Cropping Isn’t Always Permanent
Here’s something I wish someone had told me earlier. According to Smallpdf, Preview uses non-destructive cropping — meaning the content outside your selected area is hidden, but it’s not actually deleted from the file.
So if you’re sending a sensitive document and you’re cropping out private information, don’t assume it’s gone forever. It might still technically be embedded in the file.
Speed Things Up With Keyboard Shortcuts
If you’re like me and you crop images fairly often, memorizing a few shortcuts will save you a ton of time. Trust me on this one.
According to a detailed breakdown from ladedu.com, you can use the arrow keys to nudge your selection by one pixel, or hold Shift with an arrow key to move it by 10 pixels at a time. You can also zoom in and out with Command + and Command -, and when you’re ready, just press Command K to crop instantly.
There’s also a neat trick if you want to “cut” instead of crop: use Command Shift I to invert your selection, then crop from there. I use this one when I want to remove a specific object from a photo rather than keep just one section.
What If the Crop Button Is Greyed Out?
This one trips up a lot of people, and honestly, it tripped me up the first time too. If this happens alongside other odd Mac behavior, it’s also worth ruling out bigger performance issues — I cover common culprits in my Mac slow boot fixes guide.
If your Crop option won’t click, it’s usually because Preview doesn’t detect an active selection yet. Per UPDF’s troubleshooting guide, if the Crop menu item is greyed out, you need to first make a selection using the Rectangular Selection tool — and if that tool isn’t visible, you can go to Edit > Select All, then drag the selection over the area you want to keep before heading to Tools > Crop.
Simple fix, but easy to miss if you’re moving fast.
The Screenshot Workaround (For Permanent Crops)
If you want a crop that’s truly locked in — no hidden data, no chance of reverting — there’s a clever workaround using your Mac’s built-in screenshot tool.
Here’s the method, based on guidance from itselectable: open your PDF in Preview, go to File > Take Screenshot, choose Selection, Window, or Entire Screen, and once you’ve got your cropped screenshot saved as a PNG, go to File > Export as PDF to convert it back.
This method flattens your document completely, which is perfect for situations where privacy or file cleanliness really matters.
Preview vs. Other Cropping Tools
You might be wondering how Preview stacks up against the paid or web-based alternatives out there. Here’s the honest breakdown:
| Tool | Cost | Ease of Use | Best For |
|---|---|---|---|
| Preview (Mac) | Free (built-in) | Very easy | Quick, everyday crops on images and PDFs |
| Adobe Acrobat Pro | Paid subscription | Moderate | Advanced PDF editing, batch cropping, precise crop marks |
| Smallpdf | Free tier + paid plans | Easy | Bulk cropping, cloud-based workflows |
| Sejda | Free (limited) + paid | Easy | Quick online crops without installing software |
My take: if you just need to crop a photo or trim a PDF page here and there, Preview is genuinely all you need — it’s free, it’s already on your Mac, and it does the job in under a minute. If you’re regularly batch-processing dozens of PDFs or need pixel-perfect crop marks for print, that’s when I’d reach for Acrobat or a dedicated web tool like Smallpdf.
Bonus: Resizing and Batch Editing
While we’re here, it’s worth mentioning that Preview isn’t just for cropping. You can also handle image resizing and even edit multiple photos at once.
To resize several images at the same time, display them together in the same window, select them all in the sidebar, then choose Tools > Adjust Size. This is a massive time-saver if you’re prepping a batch of photos for a website or presentation.
Frequently Asked Questions
Can I crop a PDF in Preview?
Yes. Open the PDF, show the Markup Toolbar, select the Rectangular Selection tool, drag over the area you want to keep, then click Crop or press Command-K.
Does cropping in Preview delete the original image?
No — Preview’s cropping is non-destructive by default. You can undo it via Edit > Undo Crop, or recover an earlier version through File > Revert To > Browse All Versions.
Why is the Crop button greyed out in Preview?
This usually means you haven’t made an active selection yet. Use the Rectangular Selection tool to draw a box first, then Crop should become clickable.
Can I crop to an exact pixel size in Preview?
You can view and adjust your selection’s dimensions using the Crop Inspector (Tools > Show Inspector), but Preview doesn’t offer a type-in-exact-dimensions auto-crop feature.
Is Preview cropping permanent?
Not necessarily. Preview hides the cropped-out content rather than deleting it outright. For a fully flattened, permanent crop, use the screenshot-and-export method described above.
Can I crop multiple images at once in Preview?
Not directly — cropping is a one-image-at-a-time action. However, you can resize multiple images simultaneously via Tools > Adjust Size.
Final Thoughts
So there you have it — everything you need to crop in Preview like a pro, whether you’re working with images or PDFs.
Here’s my honest take: for quick, everyday edits, Preview genuinely holds its own against paid tools. You don’t need Photoshop. You don’t need Adobe Acrobat. You already have everything you need sitting right there in your Applications folder.
Give it a shot next time you need a quick crop — I think you’ll be surprised at how capable this “simple” app really is.