
How to Install RAM: Complete Step-by-Step Guide (2026)

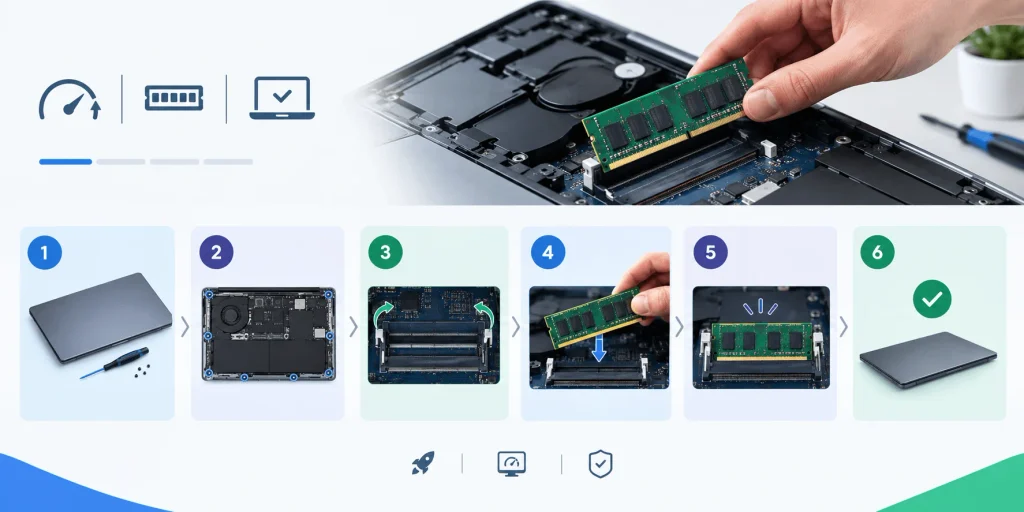
Installing RAM takes about 15–20 minutes and requires only a screwdriver and an anti-static wrist strap. You match your new memory module to your motherboard’s supported generation (DDR4 or DDR5), ground yourself to avoid static damage, align the notch on the module with the slot, and press down firmly until it clicks into place. Once installed, your computer will automatically detect the new memory. That’s the short version. Below, I’ll walk you through the full process for both desktops and laptops, plus how to verify the install and fix it if something goes wrong.
Let’s get into it.
What Is RAM, and Why Does It Matter?
Before you grab a screwdriver, let’s quickly cover what you’re actually upgrading — because understanding this makes the whole process click.
RAM (Random Access Memory) is your computer’s short-term memory. It stores the data your active programs need right now, so your CPU doesn’t have to keep fetching information from your slower storage drive every time you switch tasks.
Think of it like a desk. A bigger desk means you can spread out more papers (programs) at once without shoving things aside. Run out of desk space, and everything slows to a crawl — that’s your system swapping data back and forth, and it’s painful to watch.
More RAM means:
- Smoother multitasking across browser tabs, apps, and background processes
- Faster load times for memory-intensive software like video editors or games
- Fewer freezes when your system is under heavy load
A RAM upgrade is genuinely one of the fastest and most affordable ways to make an aging machine feel new again. You don’t need a new computer. You need more memory. If your system already feels sluggish at startup, it’s worth checking whether memory is the bottleneck — see our guide to fixing slow boot times for the full diagnostic checklist
DDR4 vs. DDR5: Know the Difference Before You Buy
Here’s where most people mess up. They buy a RAM kit, get excited, crack open their PC — and the module doesn’t fit, or worse, it fits but doesn’t perform the way they expected.
DDR4 and DDR5 are not interchangeable. The notch position and pin count differ between the two, so a DDR5 stick physically will not seat in a DDR4 slot. Here’s a quick side-by-side:
| Feature | DDR4 | DDR5 |
|---|---|---|
| Typical speed range | 2133–3200 MT/s | 4800–8000+ MT/s |
| Voltage | 1.2V | 1.1V |
| Max module capacity | Up to 32GB per stick | Up to 128GB per stick |
| Notch position | Different from DDR5 | Different from DDR4 |
| On-die ECC | No | Yes |
| Motherboard compatible with both? | No — DDR4 boards only accept DDR4 | No — DDR5 boards only accept DDR5 |
Your motherboard’s manual or manufacturer’s spec page will tell you which generation it supports. Check this before you buy anything — it’s the single most common mistake in RAM upgrades.
Other Compatibility Factors to Confirm
- Form factor: Desktops use full-sized DIMM modules; laptops use smaller SO-DIMM modules. These are not interchangeable.
- Maximum capacity: Check what your motherboard and CPU actually support.
- Slot count: Determines whether you can run dual-channel memory (you’ll want a matched pair for that).
- Rated speed: Your new RAM should align with what your board supports, ideally with an XMP (Intel) or EXPO (AMD) profile so it can hit its advertised speed instead of a generic default.
If you’re not sure what your system supports, Crucial’s and Kingston’s system-scanner tools can identify validated modules for your exact board — a quick way to remove the guesswork before purchasing.
How Much RAM Do You Actually Need?
This depends entirely on what you do with your machine. Here’s a quick reference:
| User Type | Recommended RAM | Typical Use |
|---|---|---|
| Casual / browsing | 8GB | Web browsing, email, office docs |
| Everyday user | 16GB | Multitasking, light photo editing, streaming |
| Gamer / creator | 32GB | Gaming, video editing, multiple large apps |
| Professional / 3D work | 64GB+ | Rendering, large datasets, virtual machines |
If you’re unsure, 16GB is a safe, future-proof baseline for most people in 2026. (Check out our best RAM kits for gaming if you’re building around 32GB.)
What You’ll Need Before You Start
Gather these first so you’re not hunting for a screwdriver mid-install:
- Your new RAM modules (already matched to your system)
- A Phillips-head screwdriver
- An anti-static wrist strap (or at minimum, a grounded metal surface to touch)
- Your motherboard or laptop’s manual, if you have it handy
- A flashlight — DIMM slots are dark and cramped
That’s it. No special tools, no soldering, nothing intimidating.
Step 1: Power Down and Ground Yourself
This step matters more than people think.
Static electricity can quietly damage a RAM module or motherboard component without you even noticing it happened. So before you touch anything internal:
- Shut down your computer completely
- Unplug it from the wall
- If it’s a desktop, disconnect the back-panel cables so you can lay the case on its side
- Put on an anti-static wrist strap, or touch a grounded metal object to discharge yourself
This is one of the first habits worth building if you’re new to PC building. It’s a small step that prevents a genuinely expensive mistake.
Step 2: Installing RAM on a Desktop
Here’s the part you came for. Let’s walk through it.
Locate the Correct DIMM Slots
Open your case and find the DIMM slots on your motherboard. Don’t just grab the nearest slot — refer to your motherboard manual to see which slots you need for a single stick versus a matched pair. For dual-channel setups, this is often something like slots A2 and B2, though it varies by board.
Unlock the Clips
Each DIMM slot has a clip (sometimes two) on the side. Push it outward to unlock it before inserting the module.
Align the Notch
Every RAM stick has a small notch cut into its bottom edge. It’s positioned to match a divider inside the slot, so there’s really only one correct way to insert it. Line these up carefully.
Seat the Module
Lower the module into place and press down firmly and evenly on both ends. You’ll feel it “click” into place as the clips lock automatically. Don’t force it. If it’s not going in smoothly, stop and recheck the alignment — forcing a misaligned stick can damage the slot.
Double-Check the Seating
Give it a visual once-over. Both clips should be locked, and the module should sit flush and level in the slot. Nothing should look tilted or partially inserted.
Step 3: Installing RAM on a Laptop
Laptops follow a similar logic but with a smaller, more delicate process.
Power Off and Access the Memory Compartment
Shut the laptop down, unplug it, and remove the battery if it’s removable. Then locate and remove the back panel or memory access door — usually secured with a few small screws.
Remove the Old Module (If Replacing)
Gently spread the retaining clips outward. The old stick should pop up at an angle. Slide it out carefully.
Insert the New SO-DIMM
Align the notch, insert the module at roughly a 30-degree angle, then press it down flat until the clips click into place. Most users can complete this entire process in about 15 minutes with just a screwdriver and an anti-static strap.
Reassemble and Power On
Put the back panel on, reinsert the battery if applicable, and boot up.
One thing to flag: not every laptop is upgradeable. Slim ultrabooks increasingly ship with soldered memory that can’t be swapped — our MacBook Air buying guide breaks down which current models still support user upgrades. Check your device’s service manual before buying anything.
Step 4: Boot Up and Verify the New RAM
You’re not quite done. This step confirms the install actually worked.
Power on your computer and check that it boots normally — no beeping, no black screen hanging indefinitely.
Once you’re in the OS, verify the new capacity:
- Windows: Task Manager → Performance tab
- Mac: About This Mac
- Third-party tool: CPU-Z, for a more detailed breakdown of speed, timings, and channel configuration. You can also confirm capacity directly from the terminal — see our Command Prompt guide for the exact commands.
If your total doesn’t match what you installed, don’t panic yet — reseating usually fixes it.
Step 5: Enable XMP or EXPO for Full Speed
Here’s a step a lot of guides skip entirely, and it’s genuinely important.
By default, your new RAM might run below its rated speed until you enable its performance profile in the BIOS. Restart your PC, enter the BIOS (usually Delete or F2 at startup), and look for XMP on Intel systems or EXPO on AMD systems. Enable it, save, and reboot.
Without this step, you could be leaving real performance on the table even after a successful physical install.
Troubleshooting: When RAM Isn’t Detected
If your system won’t boot or doesn’t recognize the new memory, work through this checklist:
- Reseat the module. Remove it and reinsert it firmly, making sure both clips lock.
- Test one stick at a time. If you installed two modules, isolate which one (if any) is faulty.
- Recheck compatibility. Confirm you didn’t accidentally mix DDR4 and DDR5, or exceed your motherboard’s max supported capacity.
- Try different slots. Occasionally a specific slot is the issue rather than the module itself.
Reseating and testing modules individually resolves the vast majority of no-boot situations after a RAM upgrade.
Common Mistakes to Avoid
- Skipping the compatibility check and buying the wrong generation or form factor
- Forcing a module that isn’t aligned correctly
- Forgetting to ground yourself before handling components
- Not enabling XMP/EXPO, leaving performance unused
- Mixing mismatched RAM kits, which can prevent dual-channel mode from working properly
Frequently Asked Questions
Does RAM require activation after installation?
No. Your system automatically detects and uses new memory once it’s properly seated — no drivers or activation needed.
Can I mix RAM brands or speeds?
You can, but it’s not recommended. Mismatched modules run at the speed of the slowest stick, and you may lose dual-channel performance entirely.
How long does RAM typically last?
RAM modules generally last 10+ years under normal conditions, assuming they aren’t damaged by static electricity or physical stress.
Do I need to reinstall my operating system after adding RAM?
No. Your operating system recognizes the additional memory automatically without a reinstall.
Is 16GB or 32GB better for gaming in 2026?
16GB is sufficient for most current titles, but 32GB gives more headroom for background apps, streaming software, and future game requirements. See our 16GB vs 32GB RAM comparison for a deeper breakdown.
Final Thoughts
Installing RAM isn’t nearly as intimidating as it sounds. Check compatibility, ground yourself, align the notch, and press firmly until it clicks. That’s genuinely most of the process.
Take your time with the compatibility step especially — it’s where nearly every mistake happens. Get that right, and the physical installation takes less time than making a cup of coffee.
Your computer will thank you for it.