How to Screenshot on Windows: 6 Easy Ways (2026 Guide)

Short answer: Press Win + Shift + S, drag over the area you want, then paste it with Ctrl + V. For a file saved automatically, press Win + PrtScn instead. Both work on Windows 10 and Windows 11.
You want to know how to screenshot on Windows, and you probably want it right now.
Fair enough.
But here’s the catch. Windows gives you six different ways to capture your screen, and each one saves the image somewhere different. That’s exactly why so many people end up asking, “Where did my screenshot go?”
So I’ll walk you through every method, step by step.
The Quick Answer: How to Screenshot on Windows at a Glance
Short on time? This section is your cheat sheet. It shows which screenshot shortcut does what, and where each capture ends up. The rest of the guide covers the details, the settings and the strange edge cases. Meanwhile, bookmark this part. I’m fairly sure you’ll come back to it.
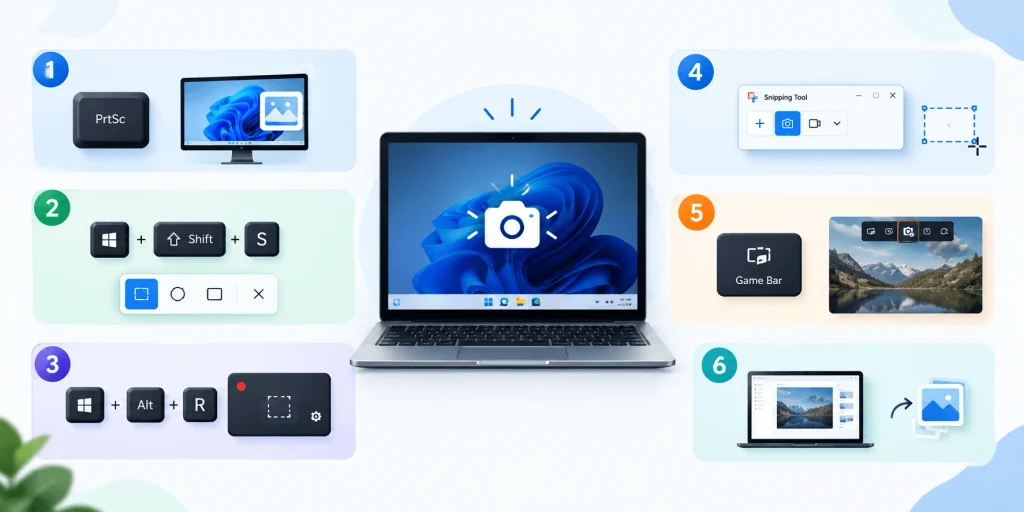
| Method | Shortcut | What it captures | Where it goes | Best for |
|---|---|---|---|---|
| Print Screen | PrtScn | Full screen (or a region, depending on settings) | Clipboard | Fast paste into chat or email |
| Active window | Alt + PrtScn | One window | Clipboard | Clean single-app shots |
| Auto-save | Win + PrtScn | Full screen | Pictures > Screenshots | Instant files |
| Snipping Tool | Win + Shift + S | Any region you pick | Clipboard, then the Snipping Tool editor | Precision and markup |
| Video snip | Win + Shift + R | A screen region, as video | Videos > Screen Recordings | Walkthroughs |
| Xbox Game Bar | Win + Alt + PrtScn | Active game or app | Videos > Captures | Full-screen games |
Those first four rows come straight from Microsoft’s keyboard shortcut list. The Game Bar row relies on Laptop Mag’s shortcut rundown and this save-location guide.
How to Screenshot on Windows Using the Print Screen Key
The Print Screen key is the oldest trick in the book. It has lived on keyboards for decades, and it still works. You’ll see it labeled PrtScn, PrtSc or Prt Sc. However, what it does now depends on your settings, and that surprises many people. Let me explain what’s going on.
Capture Your Full Screen With PrtScn
Press the key once.
On classic setups, nothing visible happens. Your full screen screenshot goes to the clipboard, so you need to paste it into Paint, Word or Slack.
Here’s the twist, though. Microsoft says PrtScn can now open a region selector by default. Meanwhile, the Snipping Tool support page still describes it as a full-screen clipboard copy. Test it on your own PC and see which one you get.
Capture One App With Alt + PrtScn
Sometimes you don’t want your messy desktop in the shot. I get it.
Click the window you want, then press Alt + PrtScn. Windows copies only that active window to the clipboard. No taskbar, no wallpaper, no nosy tabs.
Then paste with Ctrl + V.
Save a Screenshot Automatically With Win + PrtScn
Want a file instead? Use Win + PrtScn.
Your screen dims for a moment, which is your confirmation. Windows then saves a numbered PNG in the Screenshots subfolder of your Pictures folder.
One tip: rename it right away. “Screenshot (14).png” tells you nothing three weeks from now.
How to Screenshot on Windows With the Snipping Tool
If I had to pick one method for you, it would be the Snipping Tool. It’s built into Windows 11 and it’s free. According to Microsoft’s own guide, it merges the old Snipping Tool and Snip & Sketch into one app. Best of all, you can crop, annotate and even pull text out of an image.
Step-by-Step: Take a Snip With Win + Shift + S
Follow these steps and you’ll be capturing like a pro in under a minute:
- Get the content on your screen ready.
- Press Windows logo key + Shift + S.
- Wait for the screen to turn slightly gray. That’s your cue.
- Pick a snipping mode from the toolbar.
- Drag your cursor over the area you want.
- Click the notification to open the editor.
- Press Ctrl + S to save, or Ctrl + C to copy.
That’s the whole process.
Choose the Right Snipping Mode
Not every screen capture needs a rectangle. Snipping Tool offers five snip types, and choosing well saves you cropping later.
- Rectangle snip: drag a box around anything.
- Freeform snip: draw a custom shape.
- Window snip: click one window or dialog box.
- Full-screen snip: grab everything at once.
- Video snip: record a region of your screen.
Personally, I use rectangle about 90% of the time.
Delay Your Screenshot to Capture Menus
Ever tried to screenshot a right-click menu? It vanishes the moment you click anywhere.
That’s where the delay screenshot feature helps. Open the Snipping Tool, choose a delay of 1 to 5 seconds, then start a new snip. You can also press Alt + D. Now open your menu and wait for the countdown.
Copy Text From a Screenshot With OCR
After you capture a snip, click Text actions. The Snipping Tool then uses OCR (optical character recognition) to read the words in your image.
From there you can copy all the text, or use quick redact to hide email addresses and phone numbers before sharing. And Microsoft states that all text recognition happens locally on your device.
Try Perfect Screenshot and Color Picker on Copilot+ PCs
Two newer features, Perfect Screenshot and Color picker, work only on a Copilot+ PC. Perfect Screenshot snaps the capture area around the most important content, so you crop less. Color picker copies an exact color value from anywhere on screen.
If your PC isn’t a Copilot+ model, you won’t see them. Nothing’s broken.
How to Screenshot on Windows With Xbox Game Bar
Playing a full-screen game? Then the Snipping Tool overlay may not cooperate. Luckily, Windows has a backup called the Xbox Game Bar. It’s built for gaming, yet it captures plenty of regular apps too. Here’s how to use it without any fuss.
Use the Game Bar Screenshot Shortcut
First, press Win + G to open the Game Bar. Microsoft documents this shortcut and links to a page of Game Bar shortcuts.
Next, click the camera icon in the Capture widget. Or skip the overlay and press Win + Alt + PrtScn, which Laptop Mag lists as the screenshot shortcut. If it doesn’t fire, check that Game Bar is switched on under Settings > Gaming > Xbox Game Bar.
Find Your Game Bar Captures
Game Bar images don’t go to your Pictures folder. They land in Videos > Captures, alongside any clips you record. Press Win + Alt + R to start and stop a recording.
How to Take a Scrolling Screenshot on Windows
Let’s be honest. This is the one that trips everybody up.
Windows 11 still has no built-in scrolling screenshot feature. TechSmith confirms that the Snipping Tool captures only what’s visible, even though it has gained video recording. Frustrating? Absolutely. But you have workarounds.
Capture a Full Web Page in Microsoft Edge
For a long web page, you don’t need extra software. Open Edge, press Ctrl + Shift + S, and choose Capture full page, as TechFinitive explains.
One tall image, no stitching.
Use a Third-Party Screenshot Tool
Need a long Excel sheet or a Slack thread? Then a dedicated tool makes sense. ShareX is free and open source. TechFinitive also mentions PicPick and FastStone Capture, and Snagit supports scrolling capture as well.
Once you’ve captured your image, you can label it too. My guide on how to add text to a photo shows you how.
Where Do Screenshots Go on Windows?
This question drives a huge number of searches, and I understand why. Windows scatters your captures across three places: the clipboard, the Pictures folder and the Videos folder. Which one you get depends on the shortcut you pressed. Let me untangle it.
Quick Location Guide
- PrtScn and Alt + PrtScn: clipboard only.
- Win + Shift + S: clipboard, then the Snipping Tool editor.
- Win + PrtScn: Pictures > Screenshots.
- Win + Alt + PrtScn: Videos > Captures.
- Win + Shift + R: Videos > Screen Recordings.
Snipping Tool also saves snips automatically to your Screenshots folder, and you can change that in its Settings. One more wrinkle: if OneDrive backup is on, captures may go to OneDrive\Pictures\Screenshots instead. Want to compare backup options for your captures? See my cloud storage services comparison.
Recover a Screenshot You Only Copied
Copied something and lost it? Press Win + V to open clipboard history.
But remember, Microsoft notes it’s off by default. Turn it on in Settings > System > Clipboard. Then you can snap several shots in a row and paste them one by one.
Clear sensitive screenshots from that history when you’re done.
How to Screenshot on Windows 10 vs Windows 11
Still on Windows 10? You’re not alone. Most shortcuts work on both versions, which is nice. However, the tools behind them differ, and Windows 10’s support situation has changed. Here’s what stays the same and what to watch for.
What Works the Same
Win + Shift + S, Win + PrtScn and Alt + PrtScn work on both. Microsoft’s guide covers Windows 10 and 11 on one page. On Windows 10, the store installs Snip & Sketch instead of the new Snipping Tool.
A Heads-Up About Windows 10 Support
Microsoft ended Windows 10 support on October 14, 2025. Your PC still runs, but it gets no security updates or technical help.
There’s a paid lifeline: consumer Extended Security Updates last until October 13, 2026. That’s days away, so plan your move to Windows 11.
What If Your Keyboard Has No PrtScn Key?
Plenty of compact laptops hide PrtScn behind another key, or skip it entirely. If you’re staring at your keyboard wondering where it went, relax. There’s nearly always a workaround. And if not, you can skip the keyboard and use the Snipping Tool from the Start menu.
- Try Fn + PrtScn. Many laptops need Fn held down.
- Try Win + Fn + PrtScn for a full-screen save, per Gadget Hacks.
- Surface tablets: Volume Up + Power works on Surface Pro 4 and newer.
- Surface without PrtScn: try Fn + Space.
- Surface Pen: double-click the top button.
Or pin the Snipping Tool to your taskbar. Right-click its icon and choose Pin to taskbar. Two clicks, permanent button.
Troubleshooting: Why Your Screenshot Isn’t Working
Sometimes nothing happens, and your screenshot just doesn’t appear. Frustrating, I know. Before you throw your keyboard, try the fixes below. Most problems come down to a setting, not a broken PC.
Step-by-Step Fixes
- Check the clipboard. Open Paint and press Ctrl + V. If the image appears, it was there all along.
- Turn on clipboard history in Settings > System > Clipboard, then press Win + V.
- Allow notifications in Settings > System > Notifications. A Microsoft Q&A thread suggests this when the preview banner vanishes.
- Switch on auto-copy in Snipping Tool > Settings.
- Try the Fn key on a laptop.
- Update Windows and the Snipping Tool through the Microsoft Store.
When PrtScn Opens the Snipping Tool
You press Print Screen and an overlay appears instead. Annoying, right?
That’s now a default. To reverse it, go to Settings > Accessibility > Keyboard and turn off the Print Screen snipping option, as Microsoft describes.
When Your Screenshot Comes Out Black
Sometimes the capture fires and the file saves, but you get a black rectangle. Typically the cause is hardware acceleration, protected video, or a graphics driver issue. A Microsoft Q&A answer points to a browser plus hardware acceleration combo, and suggests updating or rolling back the display driver. Try turning off hardware acceleration in that one app first. Protected streaming content, on the other hand, may stay black by design.
Which Screenshot Method Should You Use?
We’ve covered a lot. So which method deserves a place in your daily routine? It depends on the job, because each tool shines somewhere different. Here’s how I’d match them.
- Quick share in chat or email: Win + Shift + S.
- Instant file, zero effort: Win + PrtScn.
- One clean window: Alt + PrtScn.
- Menus and tooltips: Snipping Tool with a delay.
- Games: Win + Alt + PrtScn.
- Long pages: Edge Web Capture or ShareX.
- Video walkthrough: Win + Shift + R.
Start with Win + Shift + S, then add the others one at a time. Switching between Windows and Mac? My guide on how to crop in Preview on Mac covers trimming your captures on the Mac side.
Frequently Asked Questions About Taking Screenshots on Windows
What is the fastest way to screenshot on Windows?
Press Win + Shift + S. It captures a specific area, and you can paste it right away.
Can Windows save a screenshot automatically?
Yes. Press Win + PrtScn and Windows saves a PNG to Pictures > Screenshots.
Does the Snipping Tool record video?
Yes. Press Win + Shift + R, select an area, then start. Afterward you can edit it in Clipchamp to add captions.
Can I take a scrolling screenshot with the Snipping Tool?
Not natively. Use Edge’s Web Capture, ShareX or Snagit.
How do I screenshot on a Dell or HP laptop?
The same shortcuts apply. If nothing happens, add the Fn key, such as Fn + PrtScn or Win + Fn + PrtScn, or open the Snipping Tool from Start.
How do I screenshot only one monitor?
PrtScn captures all monitors as one large image. Use Alt + PrtScn or a Window Snip with Win + Shift + S to target a single display or window.
Why is my screenshot black?
Usually hardware acceleration, protected video or a display driver issue. Turn off hardware acceleration in the affected app and update your graphics driver.
Where do my screenshots go?
It depends on the shortcut: the clipboard, Pictures > Screenshots, or Videos > Captures. See the location guide above.
Does Windows 10 have the Snipping Tool?
Yes, though Windows 10 uses Snip & Sketch for modern snips. Note that Windows 10 support ended on October 14, 2025.
How do I stop Print Screen from opening the Snipping Tool?
Go to Settings > Accessibility > Keyboard and turn off the Print Screen snipping option.
Final Thoughts
So that’s how to screenshot on Windows, from the humble Print Screen key to the modern Snipping Tool. You now have six methods, a comparison table, a location guide and fixes for the most common headaches.
My advice? Don’t memorize everything today. Just remember Win + Shift + S, and look up the rest when you need it.
Now go capture something. And the next time you wonder where a screenshot went, you’ll know exactly where to look.